We earn a commission if you make a purchase, at no additional cost to you.
Your balcony holds untapped potential. This outdoor space can become your favorite spot in your home with just a few creative touches. Whether you live in a cozy apartment or a spacious house, these DIY balcony projects will help you create an inviting area that reflects your style.
You don’t need professional skills to transform your balcony space. These eight projects range from simple weekend tasks to slightly more involved upgrades. Each one offers a chance to add personality and function to your outdoor area. Ready to get started? Let’s explore practical ways to make your balcony the retreat you’ve always wanted.

Project 1: Build Custom Pallet Furniture
Wooden pallets offer an affordable way to create unique outdoor furniture. This project lets you design seating that fits your balcony dimensions perfectly. The natural wood adds warmth to any space while keeping costs low.


Materials You’ll Need
- Two to three wooden pallets (heat-treated for safety)
- Sandpaper or an electric sander
- Outdoor wood stain or paint
- Screws and drill
- Outdoor cushions for comfort
- Clear wood sealer for weather protection

Step-by-Step Instructions
Start by inspecting your pallets for any damage or loose boards. Sand all surfaces thoroughly to remove splinters and rough edges. This step protects your skin and creates a smooth finish for staining.
Decide on your furniture design. A simple bench needs just one pallet as the base. Stack two pallets for a coffee table with storage underneath. Secure pallets together using screws at each corner for stability.
Apply your chosen stain or paint in thin, even coats. Let each layer dry completely before adding the next one. Outdoor finishes protect wood from sun damage and moisture. Seal everything with a clear weatherproof coating for lasting durability.
Add comfortable outdoor cushions to complete your seating area. Choose weather-resistant fabrics that can handle sun exposure and light rain. Your custom furniture now provides a cozy spot for morning coffee or evening relaxation.

Pro Tips
Look for pallets marked “HT” (heat-treated) rather than “MB” (methyl bromide-treated). Heat-treated pallets are safer for home projects. Check local hardware stores or warehouses for free or low-cost pallets.
Project 2: Create a Vertical Garden Wall
A vertical garden maximizes your growing area without taking up floor space. This design solution works perfectly for small balconies where every inch counts. Fresh herbs and flowers bring life to your outdoor room while improving air quality.

Required Materials
- Wooden frame or metal grid panel
- Small planters or recycled containers
- Hooks or mounting brackets
- Potting soil and plants
- Watering can with narrow spout
- Wall anchors suitable for your balcony surface

Installation Process
Measure your wall space to determine the frame size. Mount your frame securely using appropriate wall anchors. Test the stability before hanging any pots. Your structure needs to support the combined weight of containers, soil, and water.
Arrange your planters on the frame before adding soil and plants. This preview helps you create a balanced design. Mix different plant sizes and textures for visual interest. Leave enough space between containers for plant growth.
Fill each planter with quality potting soil. Choose plants based on your balcony’s sun exposure. Herbs like basil and mint thrive in sunny spots. Ferns and ivy prefer shadier locations. Water thoroughly after planting.
Create a watering schedule to keep your garden healthy. Check soil moisture every few days during warm weather. Vertical gardens may dry out faster than traditional pots. Rotate plants occasionally to ensure even sun exposure.

Select plants with similar water needs for each section of your vertical garden. This approach simplifies maintenance and prevents overwatering some plants while underwatering others.
Get Your Complete Project Shopping List
Planning all eight projects? Shop our comprehensive materials list and shopping guide. Which projects interest you most? Furniture and seating, Plants and gardens, Lighting and ambiance, Privacy solutions? This free list will make your balcony transformation easier.
Project 3: Install a String Lighting System
String lights transform any balcony into a magical evening retreat. These versatile lights create ambiance while providing functional illumination for dinner or reading. The soft glow makes your outdoor space feel warm and inviting after dark.

Supplies Needed
- LED string lights (weatherproof rated)
- Mounting hooks or cup hooks
- Extension cord (outdoor-rated if needed)
- Cable clips for neat installation
- Timer switch for automatic operation
- Measuring tape

Setup Instructions
Plan your lighting layout before installation. Sketch where you want lights to hang. Common patterns include straight lines across the ceiling or draped curves for a softer look. Measure the distance to ensure your string length works.
Install mounting hooks at your planned points. Space hooks evenly to prevent sagging. Test each hook’s grip before hanging lights. The weight of the entire string should be distributed across all attachment points.
String your lights carefully along the planned route. Start from the power source and work outward. Use cable clips to secure the cord along walls or railings. This keeps wires tidy and prevents tripping hazards.
Connect the lights to the power and test the full system. Add a timer switch to automate your lighting schedule. Set lights to turn on at dusk and off at bedtime. This convenience saves energy while ensuring your balcony always looks welcoming.

Safety Considerations
Always use outdoor-rated electrical components for balcony lighting. Check weather ratings on all products. Ensure connections stay dry using weatherproof covers. Never overload electrical outlets with too many light strings.
Design Ideas
Layer different light sources for depth. Combine string lights with lanterns or candles. Mix warm and cool light temperatures for visual interest. Dimmer switches give you control over brightness levels throughout the evening.

Project 4: Build a Folding Bistro Table
A compact dining table expands your balcony’s function without permanent space commitment. This folding design stores flat against the wall when not in use. Perfect for small apartment balconies where flexibility matters most.
Materials List
- One piece of plywood or solid wood board (24 x 30 inches)
- Two heavy-duty folding brackets
- Wood screws and wall anchors
- Sandpaper and wood finish
- Level for proper installation
- Drill with appropriate bits

Construction Steps
Cut your wood to the desired table size if not pre-cut. Sand all edges and surfaces smooth. Round the corners slightly for safety and a finished look. Apply your chosen wood stain or paint. Let dry completely before installation.
Mark mounting locations on your wall. Use a level to ensure marks are perfectly horizontal. The table needs level support for stability. Drill pilot holes and insert wall anchors suitable for your wall type.
Attach folding brackets to the wall first. Secure them firmly with appropriate screws. Test bracket movement before attaching the tabletop. Each bracket should open and close smoothly without binding.
Mount the wood surface to the brackets. Check that the table sits level when deployed. Adjust bracket positions if needed. The finished table should hold steady under normal dining weight.

Usage Tips
Add decorative elements that enhance function. A small vase with fresh flowers creates a dining atmosphere. Placemats protect the wood surface and add color. Fold the table down when hosting standing gatherings to open up floor space.

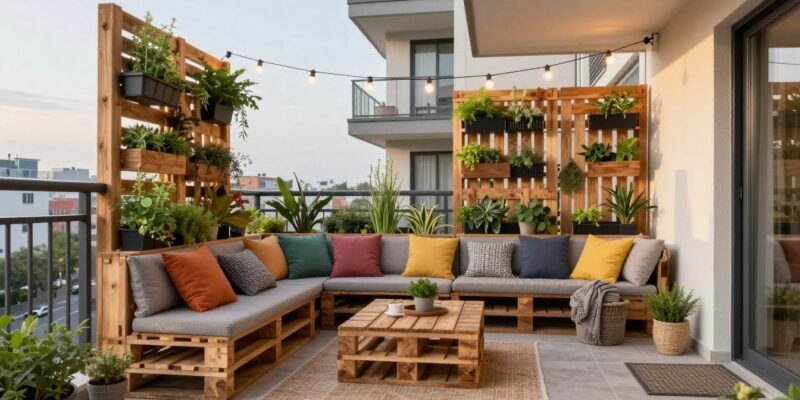
Project 5: Construct a Privacy Screen
Privacy screens create an intimate atmosphere on your balcony while blocking unwanted views. This project gives you control over your outdoor environment. Choose designs that complement your overall decor while serving a practical purpose.
Material Options
- Bamboo fencing rolls (natural, weather-resistant)
- Wooden lattice panels (classic, paintable)
- Outdoor fabric screens (flexible, various colors)
- Mounting hardware appropriate for the chosen material
- Zip ties or wire for securing
- Potted plants for natural screening (optional)

Installation Method
Measure the area you want to screen. Consider how much privacy you need versus maintaining views you enjoy. Partial screens often work better than solid barriers. They provide privacy while keeping the space feeling open.
Attach your chosen screening material to existing railings or walls. Bamboo rolls secure easily with zip ties at regular intervals. Lattice panels may need mounting brackets for stability. Fabric screens often come with their own grommets and hanging system.
Ensure the screen stands firm against wind. Add extra attachment points in windy locations. Test stability by gently pushing the screen. It should resist movement without feeling rigid.
Enhance your screen with climbing plants for a living wall effect. Train vines along lattice panels. Hang small planters from bamboo screens. This combination of materials creates a natural, layered look.

Design Variations
Full Privacy Options
Solid panels or dense bamboo create complete visual barriers. These work well for ground-floor balconies or spaces facing busy streets. Add outdoor curtains for adjustable privacy that opens when desired.
Partial Screening Ideas
Spaced lattice or partially open designs maintain airflow and some view. This approach works for upper-floor balconies where privacy matters less. You get screening from certain angles while keeping the area bright.

Project 6: Lay Interlocking Deck Tiles
Transform your balcony floor with interlocking deck tiles. This no-tools-required upgrade covers worn concrete or ugly surfaces. The modular design means you can remove tiles when moving without damaging the original floor beneath.
Shopping List
- Interlocking deck tiles (wood, composite, or stone)
- Measuring tape for area calculation
- Utility knife for cutting tiles to fit
- Broom and cleaning supplies
- Level to check floor slope
- Outdoor rug pad for cushioning (optional)

Installation Process
Clean your balcony floor thoroughly. Remove all dirt, debris, and loose materials. Sweep and wash the surface. Let it dry completely before laying tiles. A clean base ensures tiles sit flat and last longer.
Start laying tiles from one corner. The interlocking edges snap together without tools. Work across the floor in rows. Press firmly to engage the locking mechanism. You’ll hear or feel a click when tiles connect properly.
Cut edge tiles to fit using a utility knife or saw. Measure carefully and mark cutting lines clearly. Most tiles cut easily with basic tools. Leave a small gap at walls for expansion in temperature changes.
Walk across the completed floor to test stability. Tiles should feel secure underfoot. Replace any loose tiles. The finished surface provides a comfortable, attractive base for your furniture and decor.

Material Comparison
- Natural appearance
- Warm underfoot
- Requires occasional sealing
- Moderate cost
- Traditional aesthetic
- Low maintenance
- Weather resistant
- Won’t splinter or rot
- Higher initial cost
- Modern look
- Extremely durable
- Cool in hot weather
- Heavy weight
- Highest cost
- Elegant appearance

See Your Balcony’s Full Potential
Wondering how these projects will look in your specific space? Our visualization service creates custom renderings of your balcony with your chosen projects. See the results before you start building.

Project 7: Create a Hanging Herb Garden
A hanging herb garden puts fresh ingredients within arm’s reach while saving valuable floor space. This project combines function with beauty. The aromatic plants add delightful scents to your outdoor area while providing cooking essentials.
Required Supplies
- Hanging planters with drainage holes
- Ceiling hooks or railing brackets
- Potting soil formulated for containers
- Herb seedlings or seeds
- Small watering can
- Plant food for herbs

Setup Guide
Choose herbs that match your cooking style and balcony conditions. Basil, parsley, and mint thrive in sunny spots. Cilantro and chives handle partial shade better. Consider growth habits – some herbs spread more than others.
Install hanging hardware at appropriate heights. Herbs need adequate light but should stay within easy reach for harvesting. Space planters with enough room for plant growth. Consider the mature size of each herb variety.
Fill planters with quality potting soil. Don’t use garden dirt, which compacts in containers. Plant herbs at the same depth they grew in nursery pots. Water thoroughly after planting until water drains from the bottom.
Establish a care routine for your herbs. Check soil moisture daily during hot weather. Most herbs prefer slightly dry conditions between waterings. Harvest regularly to encourage bushy growth and prevent plants from getting leggy.

Herb Selection Guide
Best for Beginners
- Mint – vigorous grower
- Basil – quick results
- Chives – very hardy
- Oregano – drought-tolerant
For Experienced Gardeners
- Rosemary – needs specific conditions
- Thyme – slower growing
- Cilantro – bolts in the heat
- Dill – requires deep containers

Maintenance Schedule
Create a weekly care schedule: Check soil moisture every 2-3 days. Fertilize every two weeks during the growing season. Harvest herbs in the morning after the dew dries for the best flavor. Prune flowering stems to extend leaf production.
Project 8: Install an Outdoor Storage Bench
A storage bench solves two problems at once. You gain seating plus hidden storage for cushions, garden tools, or outdoor toys. This dual-purpose piece maximizes your balcony’s utility while maintaining a clean appearance.
Materials Needed
- Outdoor storage bench kit or materials to build from scratch
- Screwdriver or drill
- Weather-resistant wood finish
- Cushion for seating comfort
- Hinges and safety lid support (if building custom)
- Waterproof liner for interior (optional)

Assembly Instructions
If using a kit, lay out all pieces and hardware before starting. Read instructions completely. Check that you have every component. This preparation prevents stopping mid-project to search for missing parts.
Assemble the bench frame according to directions. Tighten all screws securely but avoid over-tightening, which can strip wood. The structure needs stability to support sitting weight plus stored items.
Attach the lid with hinges that allow easy opening. Add a safety support that holds the lid open while accessing storage. This prevents the lid from falling unexpectedly. Test the mechanism several times before loading the bench.
Apply protective finish to all exterior surfaces. This step extends the bench’s life by protecting against moisture and UV damage. Let finish dry according to product instructions before use.

Organization Ideas
Maximize interior storage with organization tools. Add small bins or baskets to separate different items. Store outdoor cushions in weather-resistant bags. Keep gardening gloves, small tools, and plant food together in one container. Label storage areas if you share the space with others.

Styling Your Bench
Top the bench with a comfortable cushion that invites sitting. Choose outdoor fabric that resists fading and moisture. Add throw pillows in complementary colors. The bench becomes a focal point that combines comfort with practicality.

Storage Bench Benefits
- Dual functionality saves space
- Hides clutter from view
- Additional seating for guests
- Protects stored items from the weather
- Can serve as a table surface when needed
Considerations
- Requires floor space commitment
- May limit furniture arrangement options
- Stored items need organization to stay accessible
- Cushions require storage when not in use
- Regular cleaning is needed to prevent mildew
Tips for Successful Balcony Projects
Smart planning makes any DIY project smoother. These practical considerations help you avoid common mistakes while achieving professional-looking results.
Check Building Regulations
Review your lease or homeowner association rules before starting projects. Some buildings restrict drilling into walls or adding weight to balconies. Understanding limitations saves time and potential conflicts. Ask property management about specific restrictions.

Consider Weight Limits
Balconies have maximum weight capacities. Calculate the combined weight of furniture, planters with wet soil, and people. Distribute weight evenly across the floor. Avoid placing all heavy items in one corner. Choose lightweight materials when possible.
Plan for Weather Exposure
Your balcony faces specific weather conditions. South-facing spaces get intense sun. North-facing areas stay cooler and shadier. Choose materials rated for outdoor use. Consider how wind, rain, and sun will affect each project over time.
Sunny Balconies
Use UV-resistant materials and finishes. Choose heat-tolerant plants. Provide shade options for furniture. Light colors reflect heat better. Consider retractable awnings for intense afternoon sun.
Shaded Balconies
Select shade-loving plants. Choose materials that resist moisture and mildew. Lighter colors brighten darker spaces. Ensure good drainage to prevent water accumulation. Add supplemental lighting for evening use.
Create a Realistic Timeline
Don’t rush multiple projects at once. Complete one project before starting the next. This approach prevents your balcony from becoming a construction zone for weeks. Set realistic completion goals based on your available time and skill level.

Budget Considerations
Start with priority projects that make the biggest impact. You don’t need to complete all eight projects immediately. Spread costs over several months if needed. Look for sales on outdoor items at season-end for next year’s projects.
Many hardware stores offer free workshops on DIY basics. Take advantage of these resources to build skills and confidence. Staff members can also recommend products suitable for your specific projects and climate.
Maintenance and Care for Your Balcony
Regular upkeep preserves your hard work and investment. These simple maintenance tasks keep your balcony looking fresh and functioning well through all seasons.
Seasonal Deep Cleaning
Clean your entire balcony thoroughly at the start of each season. Sweep floors and wipe down furniture. Wash cushions according to care labels. Check all structures for loose screws or damaged materials. Address small problems before they become major repairs.

Winter Protection
Prepare your balcony for cold weather if you live in a climate with harsh winters. Store or cover furniture to prevent weather damage. Bring sensitive plants indoors. Drain any water features to prevent freezing damage. Cover or store cushions in your new storage bench.
Wood Care
Wooden elements need periodic resealing. Check wood surfaces each spring for weathering. Sand rough spots and apply a fresh protective finish. This maintenance prevents rot and extends material life. Most outdoor wood benefits from annual treatment.
- Deep clean all surfaces
- Inspect for winter damage
- Refresh wood sealant
- Plant new herbs and flowers
- Check and tighten hardware
- Water plants regularly
- Clean outdoor rugs
- Wash windows and doors
- Trim overgrown plants
- Check irrigation systems
- Harvest final herbs
- Store seasonal decor
- Clean and cover furniture
- Remove dying plants
- Prepare for winter weather
Plant Care Routines
Establish consistent plant care schedules. Most container plants need more frequent watering than ground gardens. Check soil moisture rather than following a strict calendar. Fertilize according to plant type and season. Deadhead flowers to encourage continued blooming.

Pest Prevention
Monitor plants for pest problems early. Check the undersides of leaves weekly. Remove affected leaves immediately. Natural solutions like neem oil spray work well for minor infestations. Keep your balcony clean to discourage pests from settling in.
Transform Your Balcony into Your Favorite Space
These eight DIY projects give you practical ways to transform any balcony into a personal retreat. You’ve learned how to build custom furniture, create vertical gardens, install ambient lighting, and add functional storage. Each project stands alone or combines with others to create your ideal outdoor living room.
Start with the projects that excite you most. There’s no need to complete everything at once. Your balcony transformation happens one project at a time. The skills you develop carry over to future home improvements throughout your house.
Remember that successful DIY work comes from careful planning and patience. Measure twice and cut once. Take breaks when needed. Don’t hesitate to ask for help with challenging steps. The satisfaction of creating a beautiful outdoor space with your own hands makes every effort worthwhile.

Your balcony holds potential waiting to be unlocked. These projects prove that significant improvements don’t require professional contractors or large budgets. With basic tools, affordable materials, and creative vision, you can create an outdoor area that extends your living space and enhances your daily life.
The true value appears when you spend time enjoying your completed balcony. Whether you’re having morning coffee, hosting friends for dinner, or simply relaxing with a book, your transformed space provides comfort and joy. Start planning your first project today and take the first step toward the balcony you’ve always wanted.


![Briignite LED Night Light Plug into Wall[2 Pack] Dimmable Night Light with Bubble Design](https://m.media-amazon.com/images/I/51+I6P7PluL._SL500_.jpg "24 Luxury Home Items You Need Now")


![Organic Plant Magic - Fast-Acting Water Soluble Plant Food - All-Purpose Fertilizer Concentrate for Flower, Vegetable, Herb, Fruit Tree, Garden & Indoor Houseplants [One 1/2 lb Bag]](https://m.media-amazon.com/images/I/51XGClMsqeL._SL500_.jpg "Spring Garden Prep: Your Essential Checklist")